Security tab
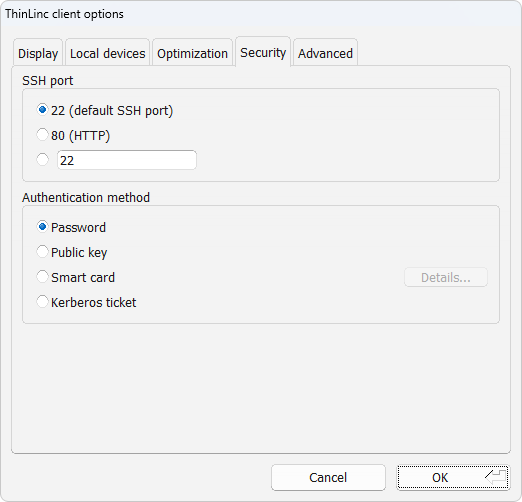
The Security tab controls how the client authenticates against the ThinLinc server. The main interface of the client will be different depending on the choices made here.

Fig. 14 Client settings security tab
Description of security tab settings
Here follows a detailed description of the settings available in the security tab.
SSH port
This option selects the TCP/IP port to use when the client tries to establish an SSH connection with the ThinLinc server. The normal SSH port is 22, which also is the default selection for this option. There can be reasons to use another port on some occasions. If you for example need to use ThinLinc over the Internet, from a location where port 22 is blocked by a firewall. Then you can select a port that is open. To be able to use a port other than 22 you need to make sure that the SSH daemon (sshd), which runs on the ThinLinc server, listens to the port you want to use. The SSH daemon can be told to listen to any wanted ports. In the client interface you can select between the default port 22, port 80 and an arbitrary port number which you can enter by yourself.
Note
If the SSH host key on the server changes, e.g. due to an upgrade of the OS or SSH server software, the client will note this fact. It will then, at the next login, open a dialog and let the user confirm that the new host key is valid. If the user clicks OK, then the host key on the client for this particular server is updated on disk.
The administrator can disallow this by manually setting the parameter
ALLOW_HOSTKEY_UPDATEto0. See Client configuration parameters for more information.
- Password
This option makes the client try to authenticate using a regular password.
- Public key
This option makes the client try to authenticate using public key encryption. The user will be asked to provide a private encryption key instead of a text password.
- Smart card
This option makes the client try to authenticate using public key encryption, but with the private key securely stored on a smart card. The user will be asked to select a certificate on the smart card and to provide the passphrase for it.
Note
Smart card authentication requires that the smart card is readable by your PKCS#11 library. The library included by default supports PKCS#15 compliant smart cards and relies on the PC/SC interface. This is always present on Windows systems and is usually installed by default on Linux systems.
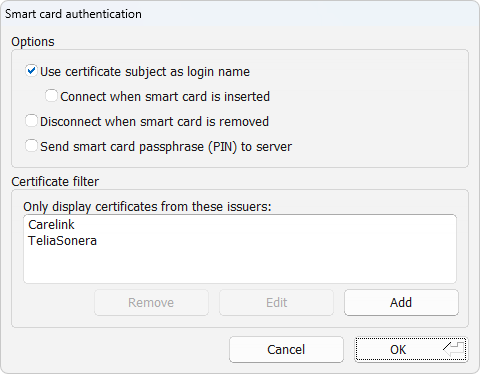
The Details… button lets you change the options for smart card usage and managing the certificate filters which are used to match accepted certificates for authentication.

Fig. 15 Smart card authentication settings
- Use certificate subject as login name
Enable this options if you want to enable automatic login. This will also hide the Username field.
- Connect when smart card is inserted
This option will try to automatically connect on card insertion. Automatic connect will occur if only one certificate is available, or if there are more than one certificate available and the chosen certificate was used the last time a session was connected.
If so desired, one can use certificate filters to make sure there is only one certificate available. Read more about automatic connection below where certificate filters are discussed.
See Automatic connection for information on how to configure the server for automatic smart card connection.
- Disconnect when smart card is removed
Enabling this options makes the client automatically disconnect when the smart card used to authenticate is removed.
- Send smart card passphrase (PIN) to server
This option makes the client transmit the smart card passphrase, as entered by the user, over to the ThinLinc server. It is required to enable smart card single sign-on.
Warning
Enabling this option reduces the security of the smart card as the passphrase would otherwise never leave the client system. The option should be left disabled if smart card single sign-on is not used.
- Smart card — certificate filter
A certificate filter is used to present only allowed certificates for authentication. Certificates that do not match any filter will be hidden from the user.
When no certificate filters are configured, all available certificates on the smart card will be available for authentication.
If the resulting filtered list of certificates contains only one certificate for authentication and the auto-connect feature is enabled, that certificate will be used for authentication.
When the login dialog is displayed and the key shortcut Control+Shift+F8 is pressed, the certificate filtering functionality is bypassed and gives you access to all certificates available on the smart card for authentication.
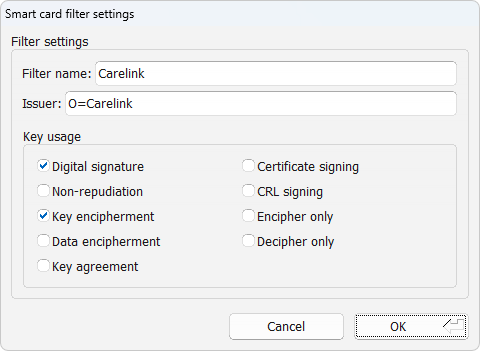
To add a new filter, press the Add button as shown in dialog Fig. 15. You can also select an available filter item in the list and press Edit to change the settings for that specific filter. Either way, the certificate filter settings dialog Fig. 16 will be shown where you can modify the settings of the filter.

Fig. 16 Certificate filter settings
- Filter name
Name that will be displayed in the filter list.
- Issuer
The certificate issuer field consists of a comma separated list of attribute-value pairs that all must be present in the certificate issuer field. Commonly the “common name” of the issuer is used, e.g.
cn=My CA. It is also possible to allow any issuer who is part of the same organization, e.g.o=My Company Ltd.. Any registered object identifier descriptor can be used as an attribute name (see IANA for a full list).- Key usage
The certificate must have all the key usage bits selected in this window. Having more bits than those selected does not exclude a certificate.
- Kerberos ticket
This option makes the client try to authenticate using an existing Kerberos ticket.
Note
This requires that a valid Kerberos ticket is available on the client, and that the SSH daemon on the ThinLinc server is configured to accept this ticket during authentication. For information about how to configure Kerberos authentication on your particular platform(s), please see the relevant vendor documentation.